How to use a protractor
To use a protractor, put its centre point on the vertex of the angle, lay the baseline along one arm, then read where the second arm crosses the scale that shows zero on your first arm. That is the whole method, and it takes a few seconds once the placement is right. The placement is where it goes wrong. US fourth graders are expected to "measure angles in whole-number degrees using a protractor" under Common Core standard 4.MD.C.6, and plenty of adults still hesitate over which of the two rows of numbers to trust. This guide covers measuring, drawing, the arm that is too short to reach the scale, and the two-second check that catches a bad reading before you act on it.
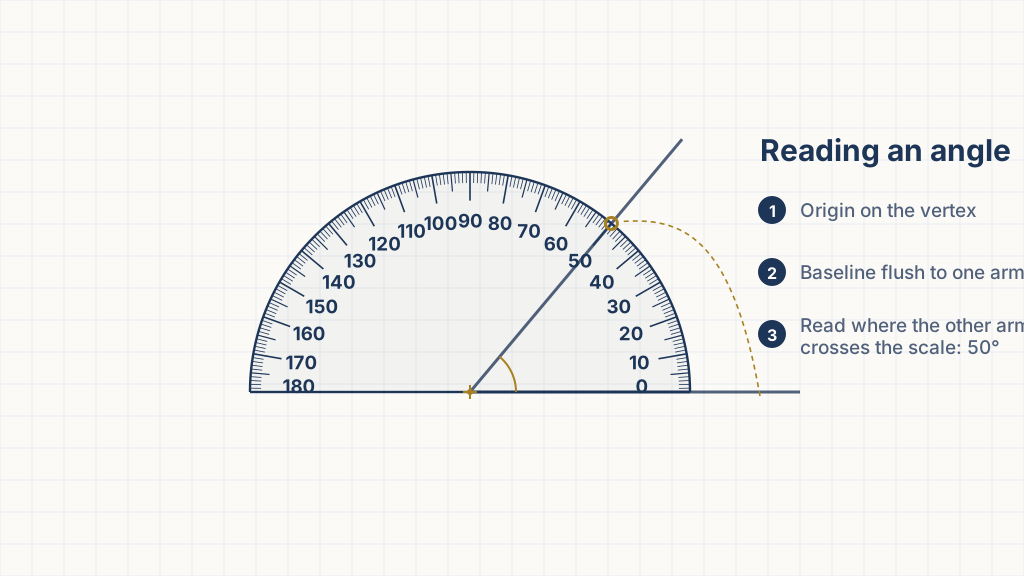
The parts you actually use
A protractor is a half circle divided into 180 equal steps of one degree each. Three features do the work. The origin is the small hole or crosshair at the middle of the straight edge, and every reading is taken from it. The baseline is that straight edge, running through zero at both ends. The arc carries the graduations, in two rows of numbers that run in opposite directions.
"An angle is measured with reference to a circle with its center at the common endpoint of the rays, by considering the fraction of the circular arc between the points where the two rays intersect the circle. An angle that turns through 1/360 of a circle is called a 'one-degree angle,' and can be used to measure angles."
Source: Common Core State Standards, CCSS.Math.Content.4.MD.C.5a: https://www.thecorestandards.org/Math/Content/4/MD/C/5/a/Read that once and the tool stops being mysterious. Your angle is the slice of a circle the two arms cut out, and a protractor is that circle, halved and printed. The semicircle covers 180 of the 360 one-degree wedges, which is why anything wider than a straight line needs a second step.
How do you measure an angle with a protractor?
Place the origin on the vertex, rotate until the baseline lies flush along one arm, then follow the second arm out to the arc. Read the scale that shows zero on the arm you lined up with. If the second arm falls short of the arc, extend it with a straightedge before you read anything.
- Extend both arms if they are short. They need to reach past the graduations. On a protractor with a 60 mm radius, draw each arm out to at least 60 mm from the vertex.
- Place the origin on the vertex. Put the centre hole or crosshair exactly on the corner where the two arms meet. A millimetre of slop here costs you more than anything else on this page.
- Lay the baseline along one arm. Rotate until the zero line sits flush against the arm down its whole length. Touching at the vertex and drifting away at the far end is the classic bad placement.
- Follow the second arm out to the arc. Read the row of numbers that started at zero on your first arm, and stay on that row.
- Count the ticks. Labels sit every 10 degrees, a longer tick marks each 5, and the small ones are single degrees. Find the last label the arm has passed, then count toward the next one. Four ticks past 30, heading for 40, reads 34.
The diagram above lands on a labelled number, which is the tidy case. Between labels it looks like this: the left arm sits on the outer zero, the second arm crosses four ticks past the 30 label, and the outer scale reads 34. The inner scale, right there under the same arm, says 146. Both numbers are printed with equal confidence. Only one of them started at zero on your arm.
How do you draw an angle with a protractor?
Draw one arm and mark its end as the vertex. Set the origin on that point with the baseline along the arm, find your degree on the scale that reads zero at that arm, and mark a small dot. Lift the protractor off, then join the dot to the vertex with a straightedge.
- Draw one arm and mark its end. That endpoint becomes the vertex.
- Set the origin on the endpoint, baseline on the arm. Same placement as measuring.
- Mark your degree. Find it on the scale that reads zero along the arm, and put the dot right against the graduation, not beside it.
- Join the dot to the vertex. Draw through the dot rather than stopping short of it.
Draw the second arm long while you are at it. A short arm is harder to measure later and harder to check. Reflex angles, construction lines and the rest of the cases are in how to draw an angle.
What if the arm is too short to reach the scale?
Extend it. Lay a straightedge along the arm, start at the vertex, and pencil the line out past where the arc will fall. The reading does not change, because the length of an arm has nothing to do with the size of an angle.
That last part is the most common misconception in the whole topic. Devichi and Munier's 2013 study in the Journal of Mathematical Behavior treats it as the error to teach against: learners read the length of the drawn rays as part of the angle's size. A 34 degree angle is 34 degrees whether its arms run 2 cm or 2 m, because the measure is the fraction of the circle between them, not the distance you travel along either one.
The study frames it as the error a teaching sequence has to design against: pupils judge an angle by how long the drawn rays are rather than by how far apart they open, so lengthening a ray reads to them as a bigger angle.
Source: Devichi, C. and Munier, V. (2013), "About the concept of angle in elementary school: misconceptions and teaching sequences," Journal of Mathematical Behavior 32, pages 1 to 19: https://doi.org/10.1016/j.jmathb.2012.10.001So extending an arm is safe, and it buys you accuracy on top. A long arm gives the baseline something to sit flush against, which makes a crooked placement obvious before you read a number off it.
Measuring the angle between two real edges
Paper angles are the easy case. For a rafter, a mitre joint, a folded box flap or the corner of a raised bed, get the angle onto paper first. Hold a sheet against the work, mark along both edges with a pencil, and take it back to the desk. You now have two arms and a vertex, and everything above applies unchanged.
For a joint you cannot get a sheet of paper into, a sliding bevel copies the angle and carries it back. Set the blade against the work, lock the wing nut, then measure the bevel itself on the protractor. Our guide to types of protractors covers when a bevel or a digital angle finder earns its place over a printed one.
Which of the two rows of numbers do I read?
The row whose zero sits on the arm you lined up with. Follow that same row around to the second arm and ignore the other one. If neither row shows zero at your first arm, the protractor is placed wrong, so reset it rather than try to fix it with arithmetic.
Two rows exist so that one of them always starts at zero on your arm, whichever way the angle happens to open. Getting this wrong is the classic failure: in the 1993 National Assessment of Educational Progress, only about a third of US eighth graders measured a 127 degree angle correctly, with three degrees of grace allowed either side. Our guide to reading the inner and outer scale has the full rule and the worked trap.
How do you check the reading?
Compare the angle to the corner of a sheet of paper before you read any number. Narrower than the corner means under 90. Wider means over 90. That single comparison kills the wrong-row error, because the two candidate readings always sit on opposite sides of 90, unless the angle is exactly 90 and both rows agree.
Then check the pair. The two numbers under the second arm add to 180, so 34 pairs with 146 and 70 pairs with 110. If your answer and the number beside it do not sum to 180, you have miscounted ticks rather than picked the wrong row. For the errors that survive both checks, centring, line thickness and parallax, see protractor accuracy.
What size protractor should you print?
The largest one your page will take. Angles read correctly at any radius, so a small protractor is never wrong, only harder to read. At a 50 mm radius one degree of arc is about 0.9 mm wide. At 150 mm it is about 2.6 mm, wide enough to split by eye, which takes most of the guesswork out of a reading that lands between two ticks.
Size starts to matter in its own right the moment you measure distance on the same drawing, and then the sheet has to come out at true scale. The protractor tool sets the radius, the tick spacing and 180 or 360 degrees, and every sheet carries a calibration bar so you can prove the size in two seconds. The print dialog settings are in printing a protractor to scale.